Execution: Step 2. Building a Content Calendar
Now, let’s put ALL of the prep work you did in the last section together. This is the portion where we combine the who, what, where, when, and why that we’ve determined above into one resource that will guide not only your content strategy, but will take the guesswork out of what you’re posting when. By planning your content out, you’ll be sure that you’re creating content that targets your audience and forwards your goals, and you’ll be able to better manage how much time you spend on it each week.
The approach that I’ve used to manage social media (and in one instance, for a very big book festival!) is to use two separate documents (which I keep as two worksheets in one Excel): a master content calendar and a master content creation document. You can certainly plan this out in the way that works best for you, but here’s how I do it.

The Master Content Calendar
First, create a master calendar and fill it in with what you’re going to post, when, and to which channel. This will ensure that you’re cycling in your key content topics to your posts and that you’re posting consistently across your channels.
Here’s what to do:
Step 1: Create a calendar
Create a calendar of the month. I create one in Excel, but you can create one on a piece of paper. Fill in any holidays or special days that you want to create content around. For example, if you’re a horror author with Halloween coming up, you definitely want to create content leading up to that. If you’re a bookstore with a tax-free weekend coming up, add it to your calendar so that you can anticipate creating content leading up to that date. Or if you’re an organization with an event coming up, add it so that you can create content leading up to it.

Step 2: List your topics
Now, list your three key topics and their subtopics on the side of your calendar. No need to come up with topics each time. You will simply fill these topics into your calendar to ensure that you’re focused on your messaging.

Step 3: List your channels
Next, list the channels you’re going to use in the left column: newsletter or blog, and each social media platform.

Step 4: Add your frequency
Next, add a number of how many posts you’ll aim for each week. For example, you may want one newsletter per week, two Instagram posts per week, and one Thread post per day.
Here are some miscellaneous things to know about posting topics and frequency:

Various Social Media Ratio Rules
The 80-20 Rule: 80% of your posts should inform, educate, or entertain your audience and 20% can directly promote your brand.
Rule of Thirds: One-third of your content promotes your business, converts readers, and generates profit; one-third of your content shares ideas and stories from thought leaders in your industry or like-minded businesses; one-third of your content is personal interactions with your audience
The 50/20/20/10 Rule: 50% entertainment/education; 20% brand information; 20% cheerleading; 10% hard selling.
Ideal Posting Frequency
Instagram: 3-5 times per week (ideally once every weekday)
Facebook: 3-5 times per week (ideally once every weekday)
Threads: 2-5 times per day
LinkedIn: 1-2 times per day
Ideal Posting Time
There used to be more talk around specific times of day to post, but because the algorithm serves up what it wants when it wants, and because more people are on at any time, timing is really what works best for your audience. For example, I’ve always had luck posting on Instagram in the early afternoon, but I’ve posted in the morning and late afternoon and it doesn’t seem to impact engagement. Just don’t post at night!
Rule of Seven
It takes someone seeing something seven times before they remember it. So, if you want someone to remember your content, message, or event, post it more than once so that it continues to get in front of their eyes. Don’t assume once is good enough.
Step 5: Fill in your topics
Now, take each topic from your list, and plug it into your calendar in the row associated with your channel. For example, Week 1 newsletter will be Topic 2. Week 2 Instagram posts will be Topic 1 and Topic 3. Make sure you evenly space your topics, and if you have an event or date coming up centered around one topic (ex., an event), add more of that specific topic in the lead-up.

Step 6: Admire your complete content calendar!
Voila! After these few steps, you now have a completed content plan for what you’re going to post, where, and when! This not only includes what you’re posting but is a distribution plan for your content as well.
But you’re not done yet. Now, let’s dig into what you’re actually going to create and send out.
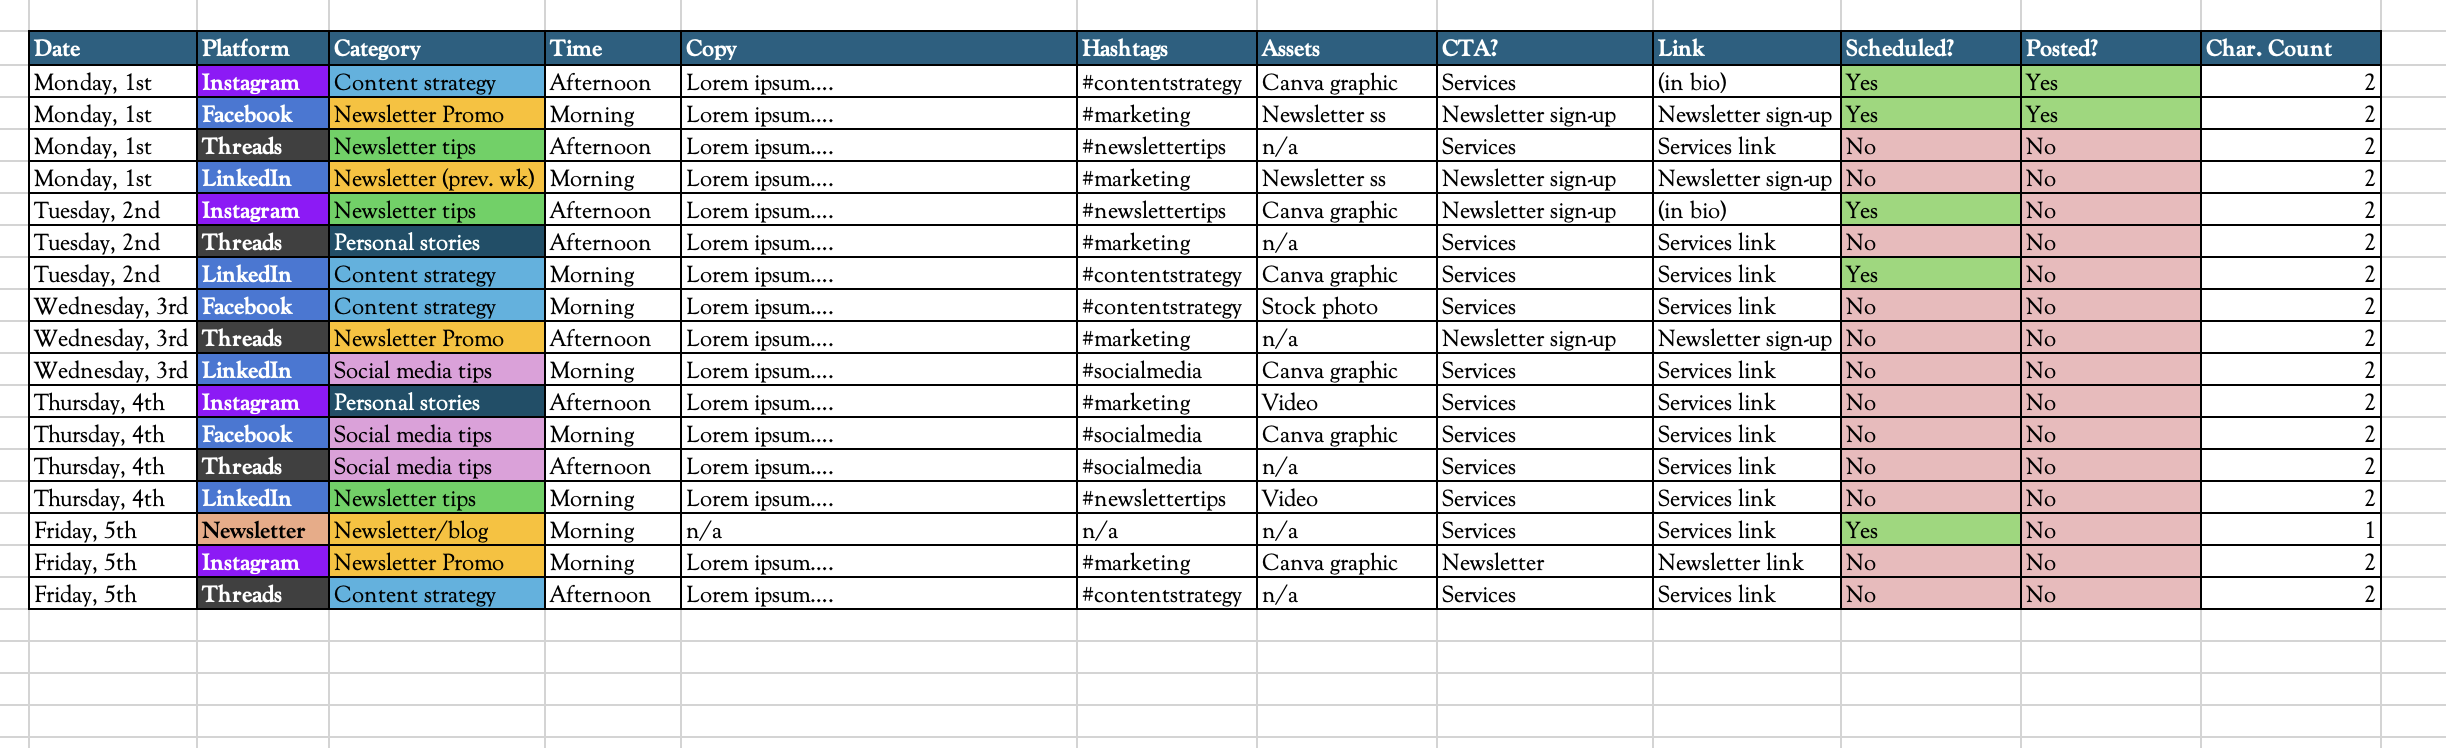
The Master Content Creation Document
Now, create a document where you’ll actually write your copy and track that it contains all the elements you need before you post it. I do this in Excel, but you may not like writing in Excel, so you can choose a Word document or whatever works best for you.
Step 1: Add your content elements
First, make sure that you’re covering your bases when it comes to what you’re posting. Create a list that includes:
Copy or caption text
Hashtags (if applicable)
@mention or tags (if applicable)
Links
Images or graphics
Where it maps to the funnel (awareness, consideration, conversion)
Call to action (CTA)
Date and time of the post
Which channel or platform you’ll post to
Posted Y/N

Step 2: Move over your plan from the calendar
Next, go back to your master content calendar and move over what you have planned to this document. You already have what you’re posting, when, and to where decided, so simply fill it in!
Step 3: Follow the calendar to create and post your content
Now, just move through the list creating your content, and post what you’ve created to your channels based on the calendar you’ve created.
In the next step, we’ll look at how to create and distribute social media.
Hi! I’m Jessica, and I help literary businesses, organizations, and authors build and execute their marketing strategies. If you'd like to learn how to do this 👆, come work with me!